In this article I’m going to talk about enabling the cPHulk Brute Force Protection on your VPS (Virtual Private Server) or dedicated server, in order to protect your server from bad login attempts.
What is cPHulk Brute Force Protection?
Because your server is opened to the whole Internet, this allows for anyone to attempt to login to your various services such as cPanel, WHM, FTP, and email accounts. A common type of attack to try to gain access to one of these services is called a brute force attack, which is essentially automating login attempts with a wide range of possibilities with the hopes of guessing the right combination to gain access.
The cPHulk Brute Force Protection that cPanel provides works at the PAM (Pluggable Authentication Module) level to detect failed login attempts. Once a set number of failed login attempts has been reached, cPHulk will block any further login attempts from the IP address that had been attempting them, for a set number of time.
Because cPHulk blocks IPs at the PAM level, it’s safe to blacklist entire blocks of IP addresses such as a certain country, without having to worry about users from those IPs not being able to access your websites or email you. They will simply be denied access to attempt a login to one of the cPanel core services.
If you’ve accidentally got yourself locked out due to this protection, you can follow my guide on how to fix cPHulk Brute Force Protection lock out to gain access again without having to wait for the block timeout to expire.
Enable cPHulk Brute Force Protection
In order to enable cPHulk protection on your server, you’ll need to have root access to the server in question.
- Log into WHM as the root user.

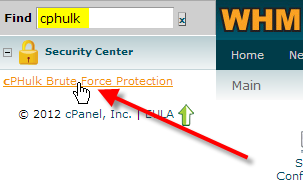
Type in cphulk in the Find box at the top-left, then click on cPHulk Brute Force Protection.

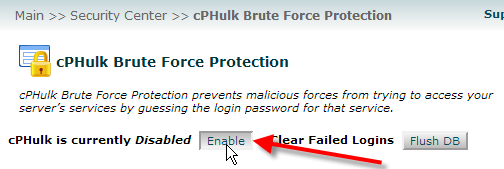
If you’d like to use the default settings, simply click on Enable at the top.
- You can modify the options in the Configuration Settings tab to adjust how cPHulk will handle blocking IPs, here are the defaults and what they do:
IP Based Brute Force Protection Period in minutes How long in minutes cPHulk will deny login attempts from a certain IP address. Brute Force Protection Period in minutes How long in minutes an IP address needs to hit its max failures within to start blocking. Maximum Failures By Account Once an account hits this limit, the entire account will be denied further login attempts. Maximum Failures Per IP Once an IP address hits this limit, that IP address will be denied further login attempts. Maximum Failures Per IP before IP is blocked for two week period Once an IP address hits this limit, it will be blocked for two weeks. Send a notification upon successful root login when the IP is not whitelisted Disabled by default, you can send yourself an email anytime there is a root login from an IP address not in your whitelist. Extend account lockout time upon additional authentication failures Enabled by default, if an IP address get blocked, and continues to try to login, each time they do it will extend their lockout time. Send notification when brute force user is detected Disabled by default, you can send yourself an email anytime a brute force attempt is detected.
You should now understand how to enable the cPHulk Brute Force Protection on your cPanel server to help protect it against failed login attempts.
Learn more about VPS security from our Managed VPS Hosting Product Guide.
Is there a way to block IP’s at the firewall level on a VPS? It seems it doesn’t support virtuozzo containters.
You certainly can. In a VPS server you can use APF or CSF. You can find more information in our full guide on server security best practices