As a reseller it is important to support the products you sell. You may be called upon by clients for help or for information. WHMCS allows to set up a fully functional support system.
- Login to your WHMCS Admin

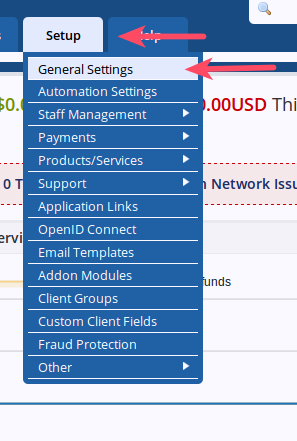
Hover over Setup

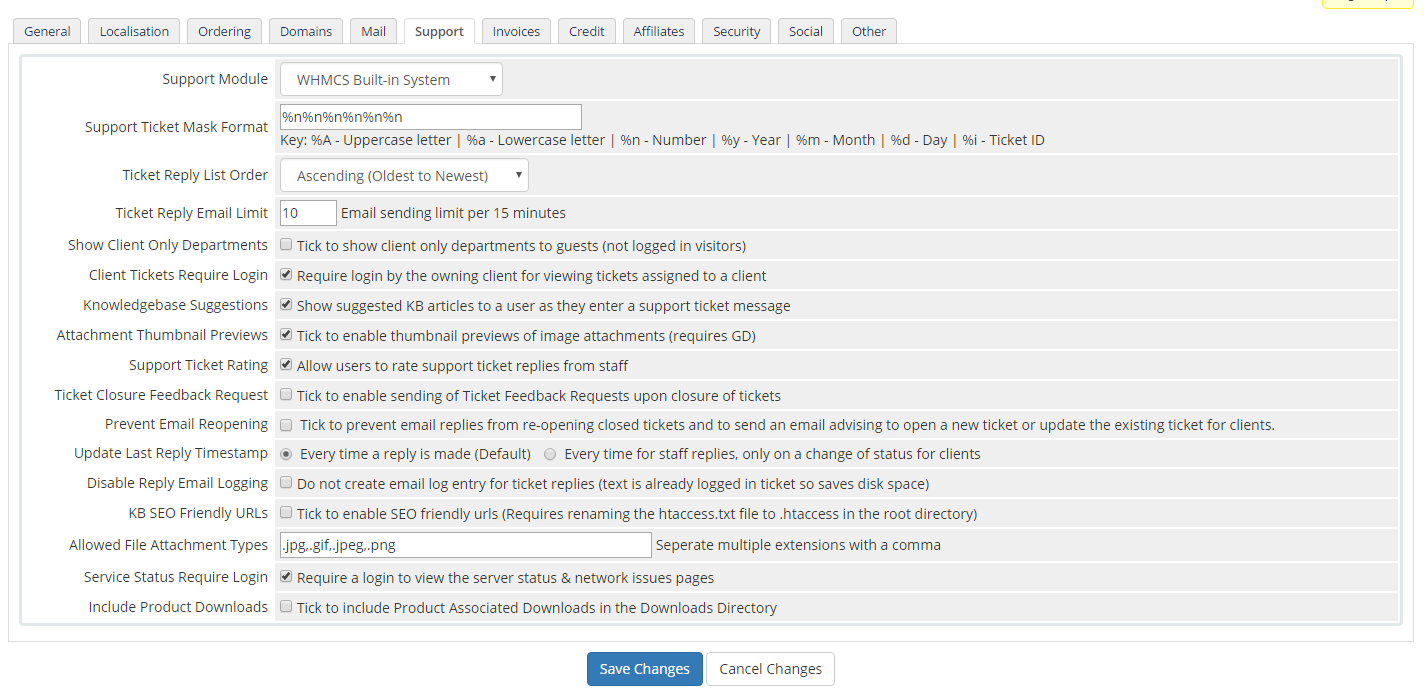
Choose the Support tab
- Fill in the settings:
Support Module: Select your option from the dropdown Support Ticket Mask Format: Key: %A – Uppercase letter | %a – Lowercase letter | %n – Number | %y – Year | %m – Month | %d – Day | %i – Ticket ID Ticket Reply List Order: Select the sort order you want to use from the dropdown Ticket Reply Email Limit: Email sending limit per 15 minutes Show Client Only Departments: Tick to show client only departments to guests (not logged in visitors) Client Tickets Require Login: Require login by the owning client for viewing tickets assigned to a client Knowledgebase Suggestions: Show suggested KB articles to a user as they enter a support ticket message Attachment Thumbnail Previews: Tick to enable thumbnail previews of image attachments (requires GD) Support Ticket Rating: Allow users to rate support ticket replies from staff Ticket Closure Feedback Request: Tick to enable sending of Ticket Feedback Requests upon closure of tickets Prevent Email Reopening: Tick to prevent email replies from re-opening closed tickets and to send an email advising to open a new ticket or update the existing ticket for clients. Update Last Reply Timestamp: Select the option you want Disable Reply Email Logging: Do not create email log entry for ticket replies (text is already logged in ticket so saves disk space) KB SEO Friendly URLS: Tick to enable SEO friendly urls (Requires renaming the htaccess.txt file to .htaccess in the root directory) Allowed File Attachment Types: Seperate multiple extensions with a comma Service Status Require Login: Require a login to view the server status & network issues pages Include Product Downloads: Tick to include Product Associated Downloads in the Downloads Directory 
Click Save Changes
Now that you have gone through the Support options you are ready to proceed to the Invoice tab.
Comments
It looks like this article doesn't have any comments yet - you can be the first. If you have any comments or questions, start the conversation!