When you subscribe to a web hosting account you will need a way to interact with the server so that you can use it for your web-based application or website. Normally, there are two ways that you can work with the server: through a web-based graphic interface or a command-line interface using a terminal client. The most popular web-based interface solution used by web-hosting companies is cPanel. Based in Houston, cPanel accounts for over 70 million domains (launched using cPanel) in over 73 different countries.
The interface that cPanel provides allows for non-technical users to be able to manage their web servers. To explain the interface in layman’s terms: cPanel is a collection of applications created to help the account owner work with their server. The command-line interface may allow more functionality, but it also requires in-depth technical knowledge. This tutorial will describe a typical cPanel account and also provide information on how cPanel accounts are created.

What’s in a cPanel Account?
In order to use a web server, you need to be able to manage files, work with databases, check statistics, set security, manage domains, and manage email. Each of these tasks may have several major functional requirements. For example, databases will require that you have the ability to create databases, add users, and manage the database content. A typical cPanel account includes several major sections:
- Files
- Databases
- Domains
- Top Applications
- Metrics
- Security
- Software
- Advanced
- Preferences
- Applications
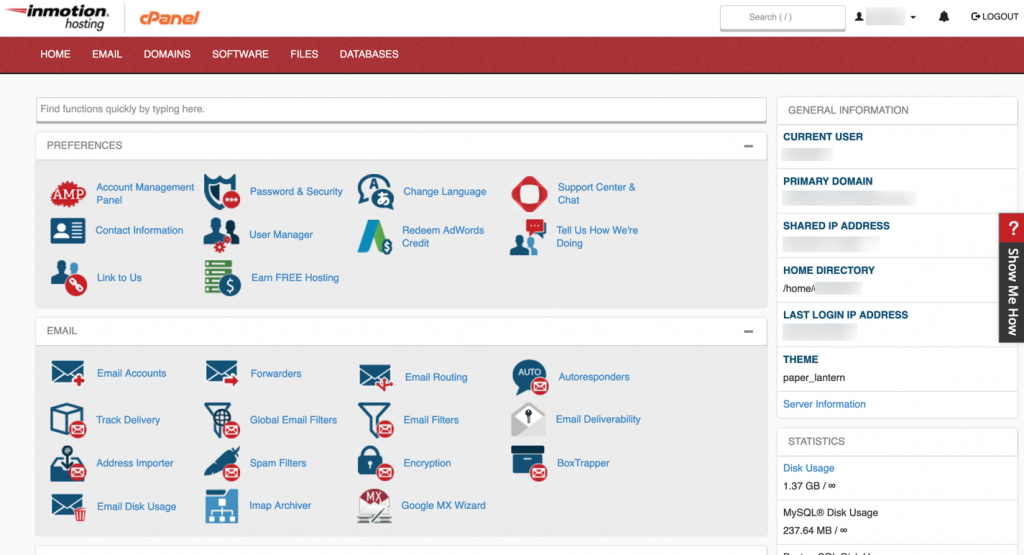
When you log in to a cPanel account you can see how the cPanel appears. Here’s an example screenshot from an InMotion Hosting shared hosting account:

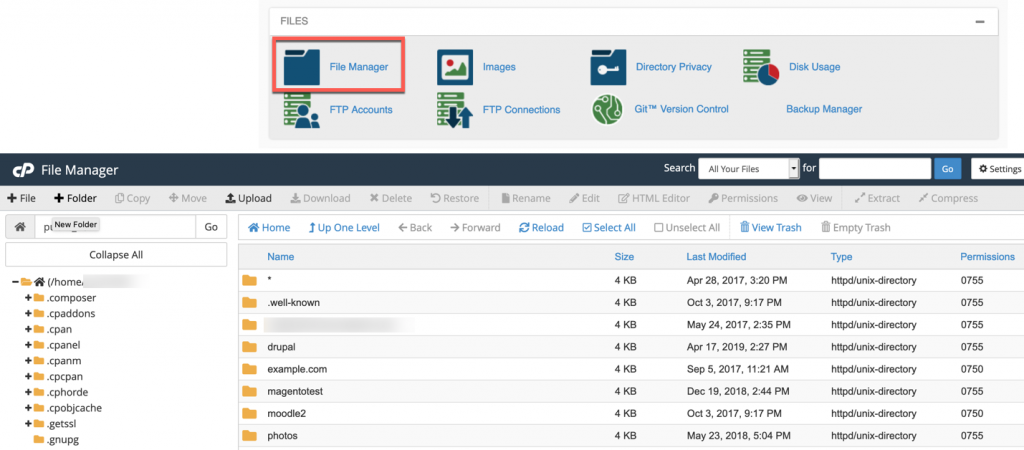
Each of these sections will have several options that you can use to work with the server assigned to your account. Here’s a very common option under Files:

You can see the File Manager application under the Files section of the cPanel. This application allows you to manipulate the files on your server. There are many other functions included with the cPanel account. If you wish to learn more about them, please see the cPanel Education Channel.
Creating cPanel Accounts
cPanel accounts for Business level accounts (shared hosting) are handled by administrators or by automated processes developed by your hosting service. If you are a VPS or Dedicated server administrator you will be able to use the Web Host Manager (another cPanel-developed interface) to manage the server at a higher level than cPanel. You can also subscribe as a Reseller that creates cPanel accounts for the purpose of reselling hosting services. With the appropriate access, you can create and manage cPanel accounts through the Web Host Manager (WHM). Here’s an example of the view you would see multiple cPanel accounts as an administrator in WHM:
The Web Host Manager controls all aspects of the creation of the cPanel account through predefined configurations called packages. You can also directly modify the configuration of an individual cPanel account. Click here to learn more about creating cPanel accounts in WHM.
Please note that you can no longer create unlimited cPanels. For more information and price listings, please see our article on cPanel Pricing Changes. To learn more about the reasons behind this change, please see our FAQ on cPanel Pricing Changes.
Congratulations! You’re now familiar with the typical cPanel account and how they can be created. Also, be aware that a cPanel account can refer to the entire instance (all the files, emails, databases, etc. that make up the account). cPanel accounts can be transferred from one cPanel server to another.

Comments
It looks like this article doesn't have any comments yet - you can be the first. If you have any comments or questions, start the conversation!