If you are using a newer version of Mac OSX then please see the updated version of this article. The updated article applies to Mac OSX “Mavericks” to Mac OSX “El Capitan” (versions 10.92 – 10.11.3) and Apple Mail client versions 7.2 – 9.2.
Please note that the following tutorial graphics are pre-Mavericks (version 10.9). The order for the information to fill in the fields are the same, but presented a little differently.
If you are unsure what your email settings are, you can find them with our Email Configuration tool.
The following tutorial will show you how set up your email accounts in the default Apple email client, Mac Mail. If you have any questions regarding this set up, please feel free to contact support and we can assist you further.

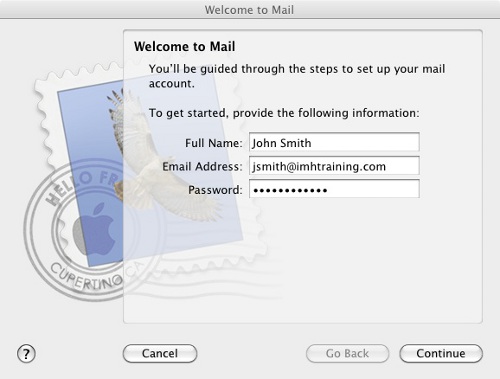
Step 1: When you initially open MacMail, you will be presented with a screen similar to the one above. Fill out the requested information. Once you have done this, click Continue.

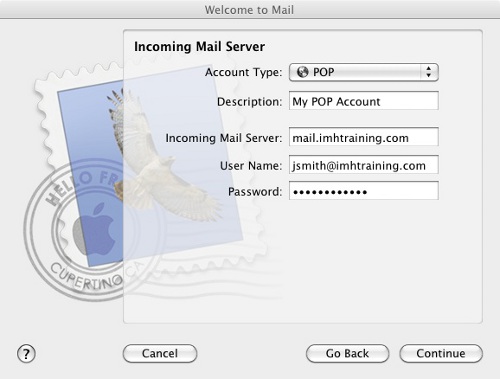
In this next screen you put in the information regarding how MacMail will receive email. For account type select either POP or IMAP (If you would like to know the differences between POP and IMAP please consult: Getting Started Guide: Email). For “Description” you can enter anything you would like so you know what account this is (useful for if you have multiple accounts). For “Incoming Mail Server” the server name will be mail.example.com. In the above example, the domain is imhtraining.com, the mail server is mail.imhtraining.com. In the “User Name” field put your Full Email Address. Just putting the part before the “@” will cause the server to not be able to authenticate correctly. In the password field put the password for the email account.
Please note, MacMail uses SSL by default. As a result when you use mail.example.com with IMAP there will be a warning asking you if you want to trust and accept an SSL certificate. It is perfectly safe to click allow for this. If you would like for this message to not appear and are in a shared environment change the mail server to securexx.inmotionhosting.com, where xx is your server number. For example, if your Welcome Email states that your account is on biz54.inmotionhosting.com, your outgoing server name should be secure54.inmotionhosting.com. If you are unsure, please contact support.

Step 3: Much like the earlier screen for the Incoming Mail Server, we must now set the sending settings. Fill out the “Description” field as you see fit. The “Outgoing Mail Server” field should be filled out with the same server that was used in the “Incoming Mail Server” field. Check the box that says “Use only this server“. Also check the box that says “Use Authentication” and fill in the “User Name” field with your Full Email Address and “Password” with that account’s password.
Again note, MacMail by default uses SSL. As a result when you use mail.example.com with IMAP there will be a warning asking you if you want to trust and accept an SSL certificate. It is perfectly safe to click allow for this. If you would like for this message to not appear and are in a shared environment change the mail server to securexx.inmotionhosting.com, where xx is your server number. For example, if your Welcome Email states that your account is on biz54.inmotionhosting.com, your outgoing server name should be secure54.inmotionhosting.com. If you are unsure, please contact support.
Once you ready, click Continue.

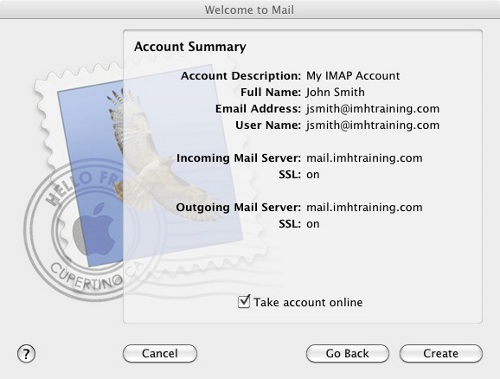
Step 4: Once you complete setting up the account you will be presented with an Account Summary screen. Click the box that says “Take account online” if it isn’t already checked. If all the information looks correct go ahead and hit create. You will now be able to use your account in MacMail.
I tried following the article but it seems that the current update is too different from the article. If there is an update post, please resend the link to me
Sorry to hear that you ran into trouble, here’s the updated article on setting up Mac Mail. It should work similarly in the latest OS.
Hi,
I am trying to get my e-mail set up on Mac Mail. I can receive the e-mails but the sending of e-mails isn’t working. I have followed the instructions given to me but it still doesn’t seem to want to work. Do you know whom I should reach out to?
Thanks.
You may want to check out our article on issues with sending email. If you still have issues after that, you will want to contact Live Support.
Why no info for how to set this up on Mail on Mac’s Sierra?? The stuff on these pages do not work – always get “Unable to verify account name or password.” although the parameters are exactly what these pages tell me to put in. Doesn’t matter if I try with or without SSL, Pop or IMAP. Nothing works.
i have tried to open my company host account on apple email and apple outlook but faild.i have put all information correct but not installed. error is. server failed.how can install this.?
Hello Asim,
Sorry for the problem with the setup of your email account on your Apple computer. We would need more information to troubleshoot the issue. If you were unable to setup the email using instructions above, then we would need to see the settings you’re trying to use. If you want to handle this issue privately, then please contact our live technical support team via email/phone/chat (contact information at the bottom of the page). If you have any further questions or comments, please let us know.
Regards,
Arnel C.
hi
i just started using inmotionhosting and set up an email account this morning. but it doesn’t work. i tried using the automatic set up from your support page, but this has failed too. i am afraid to do anything more on my own. could you help me out with this please. i am not even sure what the problem is so i can’t give you more info to help you understand what i need to do. thank you, howard
Hello Howard,
The best thing to do is to contact our Live Support so that they can walk through the settings with you to ensure they are correct. You do not want to post that kind of information here in the public area.
Kindest Regards,
Scott M
1. Open Mail. If you haven’t added a new account yet, you’ll be taken directly to the Add Account prompt. If you’re adding an additional account, or this prompt doesn’t otherwise load automatically, you’ll need to select Add Account from the Mail menu.
2. From the Add Account prompt, select Add Other Mail Account… and click Continue.534_opening_menu
3.Enter your email account information.
Full Name: Your name as you would like it to appear.
Email Address: Your full email address.
Password: The password for your email account.
4.Mail will attempt to contact the mail server. The default search uses “autodiscover.example.com” — unless you have this subdomain already created and an SSL Certificate installed, this will not work. However, don’t worry! It’s totally normal for this to happen, since Media Temple’s servers do not have autodiscover settings enabled by default.
534_man_config_msg
When an autodiscover setting has been unsuccessful, an “Account must be manually configured” message will appear. Click the Next button to complete setup manually.
5.Next, enter your incoming mail server information.
Account Type: We strongly recommend connecting via IMAP. To learn more, please see Using Email: How IMAP works.
Mail Server:Use your IP address or mail.yourdomain.com.
User Name: Your full email address.
Password: The password for your email account.
6.Click the Next button to proceed. You will be taken to a second screen to confirm additional details.
Path Prefix: Leave this area blank.
Port: You will want to connect using the correct port based on the settings you have selected.
IMAP: 143, or 993 if you are using SSL.
POP: 110, or 995 if you are using SSL.
SSL Checkbox: Check this box if you wish to connect using SSL encryption. Note that you will also need to use an SSL port (above) if you select this option.
Authentication: Be sure that Password is selected from the dropdown menu.
7.Next, we’ll configure the Outgoing Mail Server.
SMTP Server:Use your IP address or mail.yourdomain.com.
User Name: Your full email address.
Password: The password you assigned to the email account.
8.Click the Create button when you’re ready.
9.Your email account has been created, but you’ll want to verify a few steps before you get started. Select “Preferences” from the Mail menu, and click on the “Accounts” tab from the Preferences window.
10.Select your new account from the left hand column.
11.Click the “Advanced” tab and uncheck the box to “Automatically detect and maintain account settings.”
12.Navigate back to the “Account Information” tab. This time, select Edit SMTP Server List… from the Outgoing Mail Server (SMTP) drop-down menu.
13.You will be taken to the SMTP server list. Click the Advanced tab and verify the following settings:
Be sure the box to “Automatically detect and maintain account settings” is not checked!
Enter your desired outgoing mail port. Since many ISPs block port 25 (the default outgoing mail port), we strongly suggest using port 587, or port 465 if SSL is enabled.
Select “Password” from the Authentication drop-down menu, and make sure the “Allow insecure authentication” box IS checked. If you don’t see this option, you may need to update Apple Mail or Yosemite to the newest version.
[url=https://ow.ly/qgm3300gJte]Hadoop Training in Chennai[/url]
IMAP is available on all of our servers. If you are having an issue, then you may want to contact Live Support so they can check your server, settings, logs, etc.
I am an El Capitan user. I have done all of this and the setup seems complete. What is puzzling is that though I have set up the mail account on my iPhone 6, and it shows all mail sent and received through my MacBook, the mail sent from iPhone doesn’t show up anywhere – neither in sent folder of MacBook mail client nor in sent folder of iPhone mail client. Could you help solve this puzzle? Thanks!
Hello Ajay,
Thank you for contacting us. When you are connecting from multiple clients (such as MacMail, and iPhone), it is recommended to use IMAP settings. This stores the emails, and folders on the server, so each device will see the same thing.
On your phone, ensure you are subscribed to your folders. This is covered in our guide Syncing your IMAP folders on your iPhone.
Thank you ,
John-Paul
Is there a link to the new how to for OS X El Capitan? Please include. Thanks
Hello Tara,
Apologies – at this time the article is not yet up. I unfortunately have been a bit busy and have not provided an updated article yet. I will finish one as soon as I can.
If you have any further questions or comments, please let us know.
Regards,
Arnel C.
Hi,
I set up my email account on my mac (os yosemite) in imac mail. I am able to retrieve my inbox but am not able to store emails I send from my mac mail. Thus, there is always no mail in my sent folder. How do I go about fixing this?
Thanks,
Tina
Hello Tina,
I recently upgraded to El Capitan myself and the Sent folder issue is definitely puzzling. However, there is a solution that worked for me. When you’re in the Apple Mail client, go to the bottom where it lists your email account address (on the InMotion server), and the folders it has “automatically detected” with the IMAP account. I had 4 – Sent, Spam Templates and Trash. You should be able to click on SENT and then in the menu, click on MAILBOX then click on USE THIS MAILBOX AS. You will then select “Sent Mailbox”. Once I did this, the email that I sent through the Mac mail client was saving into the sent folder on my server. I verified with a webmail client so it should be working.
I hope this helps to answer your question, please let us know if you require any further assistance.
Regards,
Arnel C.
I used the Automatic Configure Scripts to set up my email on both my Mac and iPhone6. Both worked like a charm. The initial setup left me with two Trash folders. One is under my main Trash for Mac Mail. The other is located under my Inbox for this email account, along with a Draft, Junk and Sent folder. When I delete an email, it goes to my main Trash folder. Why are these other folders present? Can I delete them without messing anything up?
Hello Tim,
Thank you for contacting us. If you are using IMAP, I recommend subscribing to all folders first. This will ensure you are seeing all the available folders on the server.
If the duplicate folder does not contain anything, it should be safe to remove. If it does contain emails, you may have to save them first, or move them to another folder.
Thank you,
John-Paul
never mind… when I scrolled further down the page I found the option I needed!
I am trying to change my password, but the directions don’t correlate with the window options. There isn’t a way to change it on the webmail log in (there’s an option to change the password but it takes me to the cpanel window. There isn’t a way to change it from the webmail login window) The cpanel method doesn’t work either because there isn’t an option to “change password” after I enter a new one, and retype it. The only option is “create account”, so I get the error message saying the account already exists. Round and round…
Inmotion Hosting. What is wrong with you?! Please remove this page. This information is not current but is the first result in a Google Search. There is no excuse for you leaving this page up!
Hello Matt,
This may not be valid for the current version, but it is valid for many users out there. We will create one for the most recent version in time.
Kindest Regards,
Scott M
Yes, THis info is outdated and nearly none of it is on the new frustrating mac mail setup.
External mail server? no option for pop vs imap? wtf I hate macs?
Hello Jason,
Did you happen to read our more updated guide on MacMail for the Mavericks OS?
Does that information work for you? Or are you using an even newer version of MacMail that doesn’t contain that information either?
– Jacob
Hi……I am using OS X Yosmite v 10.10.2. I have configured my mail with the settings above, i.e, mentioning mail.yourdomain.com in the both incoming & outgoing servers……..then it had asked to trust the inmotion certifications … yes….and there…complete…..all installed and working properly.
I can’t get it to work on mac mail, i called you guys, one person told me to download the mac installer, and another told me to follow these directions….the installer worked only for my incoming mail not for outgoing, these directions nothing worked
Hello Alex,
This article is for the pre-Mavericks OS. I’m sorry that you’ve had problems with your email setup. However, if you’re having problems only with Outgoing, then the most likely culprit will be the settings. In order for us to troubleshoot the issue, we need some information from you -a domain name or the settings you’re using for the setup would help us get the picture. I can’t see your account information on this post.
I have recently completed a re-write of the Apple Mail client setup for the Mavericks OS. Please reference this tutorial if you require installation assistance in that operating system.
Otherwise, please give us some further details on your problem so that we can provide you further assistance.
Regards,
Arnel C.
mail.mydomain.com doesn’t work for my domain
Randy,
Sorry to hear that you’re having problems with your email setting. However, you have given us no information about your account in order for us to troubleshoot the issue. The “mail.mydomain.com” setting is the setting that would typically apply for domain’s email setting (if the domain name was “mydomain.com”). If you’re not hosting with InMotion Hosting, then you may need to consult your host for the proper settings. If you are hosting with us, then if you can at least provide a URL, we can take a look and see what the settings should be and if they are working.
If you require further assistance, please provide us a little more information and we’ll be happy to look into it.
Regards,
Arnel C.
Outdated information, not for Mavericks OS
Hello Kurt,
Thanks for the note. I will update the article or provide a different one for Mavericks OS. The order is still pretty much the same for the setup. However, your point is well taken. I’ll add a note on this article so that there is no confusion.
Regards,
Arnel C.