Apple continually updates its iOS for iPad and iPhone. New features often include improved security, fixed bugs, and increased performance. In order to be able to send/receive messages with the email accounts created with your domain, you will need to configure the iOS Mail App corresponding with the server settings from your email provider. Follow the steps below to learn how to add an email account in iOS. These steps also apply to other devices using iOS.
Note: The steps in this tutorial and screenshots remain valid through iOS 14.6 with a few exceptions. Screenshots have been added to provide a reference for the updates. The article was originally written using iOS 11. The steps for adding the mail account were verified on an iPhone 12 Pro.

If you’re having trouble with your WordPress host, then check out InMotion’s WordPress Hosting Solutions. We provide secure, optimized servers that are priced to meet your budget needs!
![]() Free WordPress Website Transfers
Free WordPress Website Transfers ![]() Free SSLs
Free SSLs ![]() Unlimited Bandwidth
Unlimited Bandwidth
Steps to Add an Email Account in iOS
If you want to send and receive emails using the iOS Mail App, you simply need to add your email account to the device’s list of Accounts. The steps below will guide you through the updated interface to add a Mail Account.
- From your home screen, find the Settings icon and tap on it to open it.

- In iOS versions 11 – 13, scroll to locate the Accounts & Passwords menu option and tap on it to proceed. In iOS 14 (or higher), you will not see Accounts and Passwords in the Settings section. You will first need to tap on Mail. Then you will see Accounts. Tap on either Accounts& Passwords or just Accounts to proceed. Passwords is now a separate section in Settings for iOS 14+.
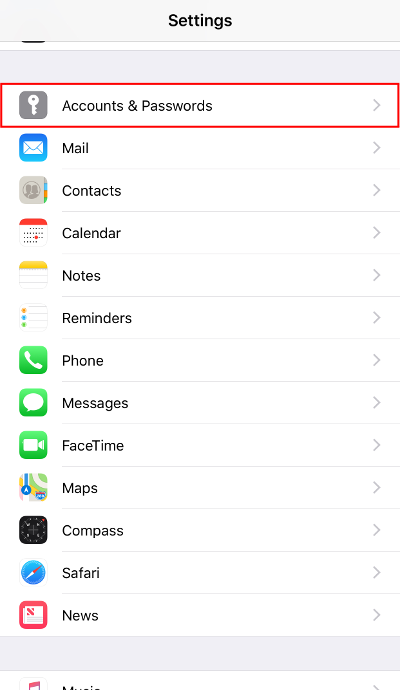
Settings: Account & Passwords option highlighted 
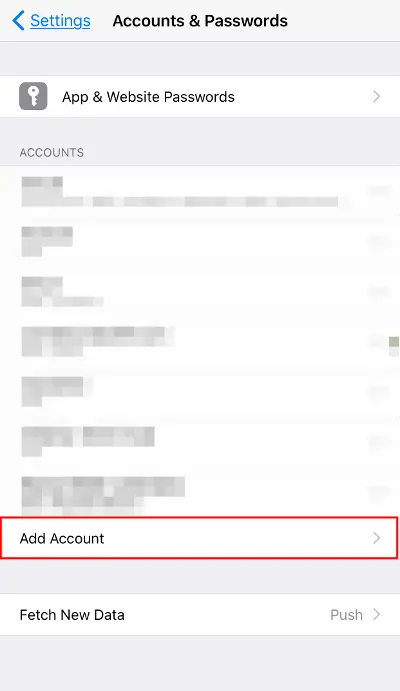
The image on the left applies to iOS 11-13. If you have version 14+, then you will simply see Accounts by itself. - In iOS 11-13 you will see a screen labeled Accounts & Passwords. There will be a list of existing email accounts and an option at the bottom labeled Add Account. iOS 14 users will see a similar screen but it will be labeled Accounts. Tap on Add Account to proceed.
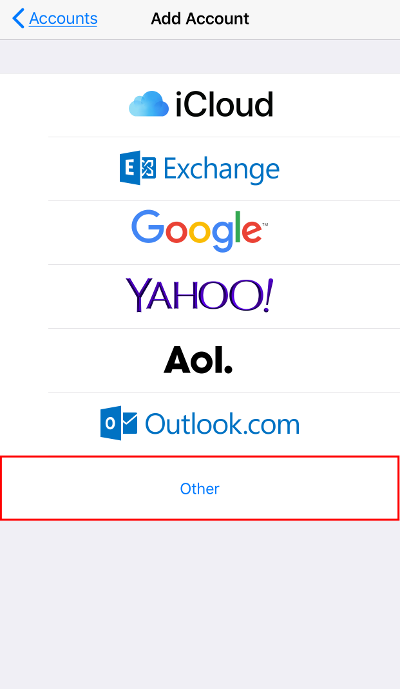
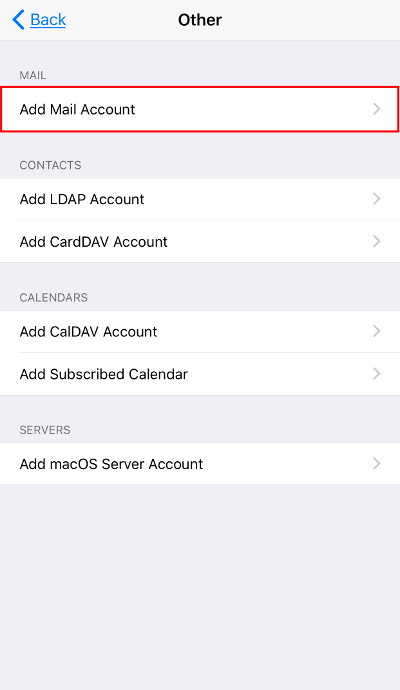
- Tap to select Other as the category of account to add.
.
- Tap on Add Mail Account to continue.
.
- Fill in the details for each field and tap Next at the top right.

NOTE: The table below provides the fields, descriptions, and sample values to explain what values are expected.
Field Description Value Name Enter your name. This name is used as the sender when addressing emails. Johnny Appleseed Email Enter the email address that you are creating this new account for. This needs to be the FULL email address. [email protected] Password Enter the password associated with your email address. [email protected]$sw0rd123! Description Enter a description to help identify this account on your device. Example Mail - At this point, you can select which protocol to use to access your email. IMAP is selected by default, however, if you want to use POP, then you can tap on the POP tab. We use IMAP in our example, as that is recommended.
NOTE: IMAP is the optimal protocol to use when accessing your email from multiple locations, escpecially on mobile devices. Select POP if this is the ONLY device you will access your email account from. Accessing an email account on multiple devices using the POP protocol can cause emails to be lost or removed.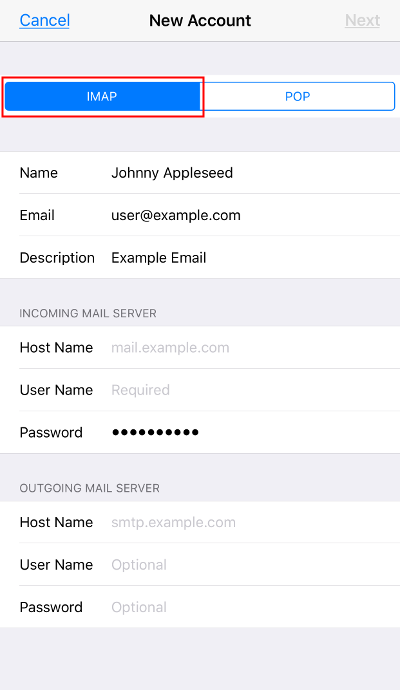
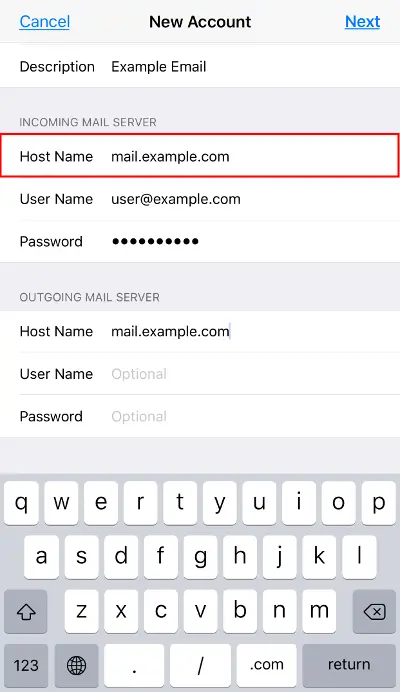
- Enter the Host Name for the Incoming Mail Server.
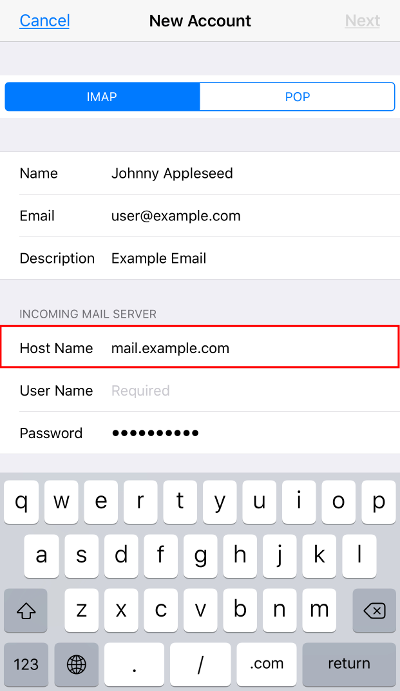
- Enter the FULL email address in the User Name field for the Incoming Mail Server.
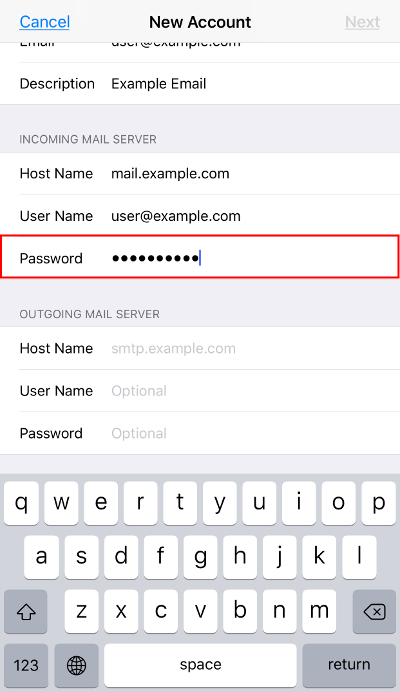
- The Password field for the Incoming Mail Server should contain the password you entered from the previous screen.
- Enter the Host Name for the Outgoing Mail Server.
- Enter the FULL email address in the User Name field for the Outgoing Mail Server.
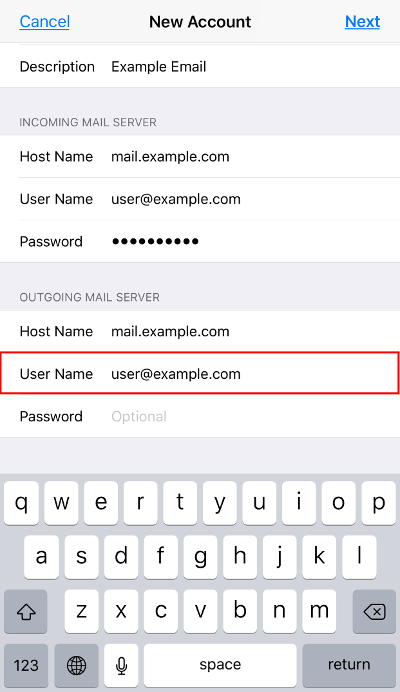
- Enter the password associated with the email address in the Password field for the Outgoing Mail Server.
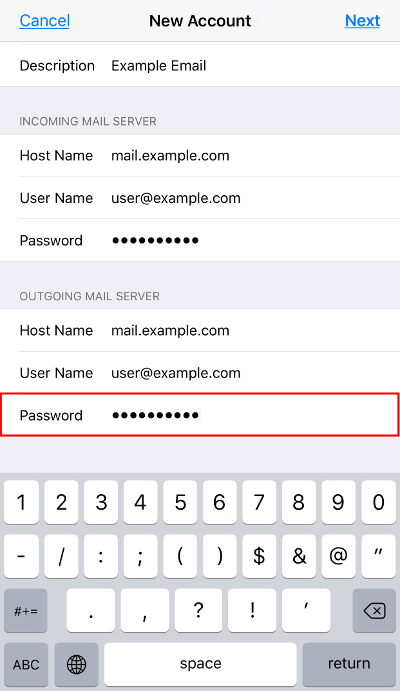
- Confirm all your settings are entered correctly, then proceed by tapping on Next at the top right.

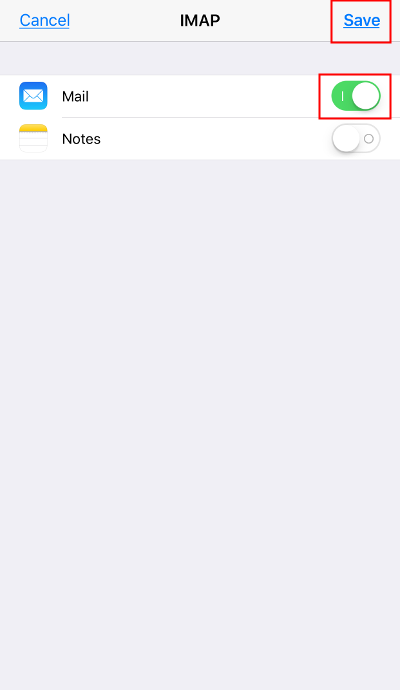
- Your iOS device will proceed to verify a connection to the mail server based on the settings entered. When successful, the next screen will allow you to add this account to your device’s additional Apps (if applicable). If you would like to setup the additional account(s), simply tap on the toggle switch to enable them. By default, Mail is enabled (since we are setting up a Mail account), so you can proceed to tap on Save at the top right.
Congratulations! You now know how to add an email account in iOS. You can begin to send and receive emails from your device. If you need to change the email server settings, check out our tutorial on How to Set the Mail Server Settings in iOS. If you are interested in accessing Webmail through cPanel’s new iOS App, be sure to check out our guide to learn How to Set Up cPanel App for iOS 11. Lastly, if you ever change your email password, be sure to update the password in your iOS mail client to avoid being accidentally blocked by fail2ban.
Trust your website to an industry leader in website hosting. Secure web hosting with InMotion Hosting and enjoy 99.99% uptime, 24/7/365 technical support, and risk-free money-back guarantee.
14 Comments
Was this article helpful? Let us know!
- Enter the Host Name for the Incoming Mail Server.
- At this point, you can select which protocol to use to access your email. IMAP is selected by default, however, if you want to use POP, then you can tap on the POP tab. We use IMAP in our example, as that is recommended.
No, In Step 8, Host Name: does one really enter mail.example.com. If not, why not show the correct one.
Hi Brian, the actual host name is going to vary depending on what your domain name is, so we opted to use a placeholder as an example.
Is there a simpler “auto config” method to have ios 15 retrieve the email settings from your mail server? Typing all of this in for the several email accounts we have is a chore. thanks!
No, unless you’re using an option from the list where you initially choose “Other.”
I reached this article from another article. In iOS 14+, the Contacts and Calendar is set up separately. Does IMH use LDAP or CardDAV for contacts, and Subscribed or CalDAV for calendars?
You can use CalDAV.
It would be very helpful if you provided email setup instructions in a pdf document that could be easily sent to end users.
Hello and thanks for contacting us. If you need the instructions offline, you could do a screenshot of the webpage and convert the image to a PDF using a program such as Master PDF Editor. I hope this helps. Alternatively, you can simply save the webpage as a text file from the web browser.
Hello,
How do i know what the “Host Names” are for ingoing and outgoing servers?
These would be the “server settings” for your email account. You can access these in your cPanel. Links to how you can find these settings are available in the article above.
My cell Iphone stopped sending emails all of a sudden. So, I deleted and reloaded my email account on my Iphone. It’s connected to server Id212. My Iphone allowed for the connection to inmotion and added the account. However, my Iphone didn’t load any of my saved emails and is NOT sending or receiving any emails. Is there something else that I need to?
Nope, there isn’t anything else to configure. Have you tried turning the device off and back on? This helps to re-establish the connection to the server from your device. If that does not resolve the issue, you should check the server to make sure the emails still exist there. If they do, you may need to manually set the IMAP Prefix. I hope this helps!